Often one of the first questions is what range to zero the rifle at. There really isn't a "correct" answer. With 5.56mm carbines I prefer to zero at 50 yards. Due to the geometry of the AR platform a 50 yard zero will also give me a 200 yard zero. This is due to the fact that the 50 yard zero is the line of sight intersecting the path of the bullet as the bullet rises from the muzzle. The bullet then travels above the line of sight from 50 yards to 200 yards. At 200 yards the path of the bullet intersects the line of sight as it is falling. This is great for a combat carbine because I can simply aim "center mass" from contact to 300 yards and get a hit. The main purpose of this zero is speed. You don't have to worry about turning turrets, holdovers or range estimation.
Precision rifle systems are designed for a different role. I prefer to use a different zero distance for them. If the engagement ranges of the rifle will be 1000 yards and closer, I prefer a 100 yard zero. The purpose for this is simple. Using a 100 yard zero, all elevation corrections will be dialed "up". All holds will be "holdovers". This may be difficult to imagine at first. I find that many new shooters have some problems with this.
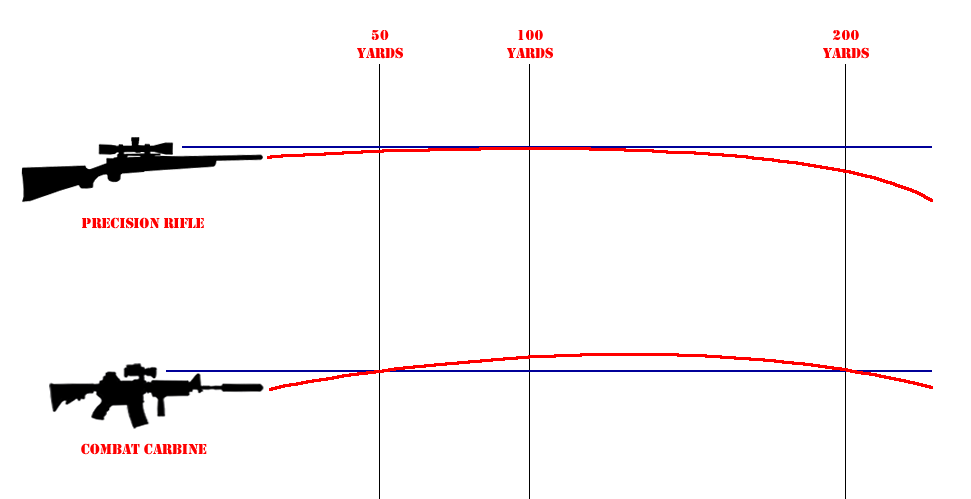
If you take a look at the table above you can see that with a precision rifle and a 100 yard zero, if you are attempting to hit a target at any distance other than 100 yards you will need to come up on your elevation. In contrast with the carbine and the 50/200 zero if you were to take a precision shot you may have to come up, or down depending on your range. I feel that only having to move your adjustments in one direction helps prevent a shooter from becoming "lost in the turret". This occurs when after a couple of adjustments the shooter cannot determine which rotation of the turret he is on.
A 100 yard zero will also be of great benefit if you are using a turret with zero stops. When you set a zero stop, you cannot dial below your zero. You can of course set the zero stop at an arbitrary setting below your zero, however this now defeats half of the purpose of a zero stop.
Finally, zeroing at extended ranges is mostly an old practice left over from the days before finger adjustable exposed turrets. In the past you could not reliably dial your scope from one range to another and expect it to return to zero perfectly. In those days it was much better to "set it and forget it". You zeroed your scope at a range where your targets were most likely to appear and left it there. Corrections were accomplished by holding over or under the target at other ranges. It is still a common practice on hunting type optics where the turrets are not able to be easily adjusted or the optic may not track reliably.
With a tactical scope and a 100 yard zero you still have the option to do something similar. You can look in your data book and select the elevation for the distance you will use most. Dial that correction onto your scope and you have now temporarily "zeroed" your scope for that distance. You can now hold over or under for other distances. |
|
 |
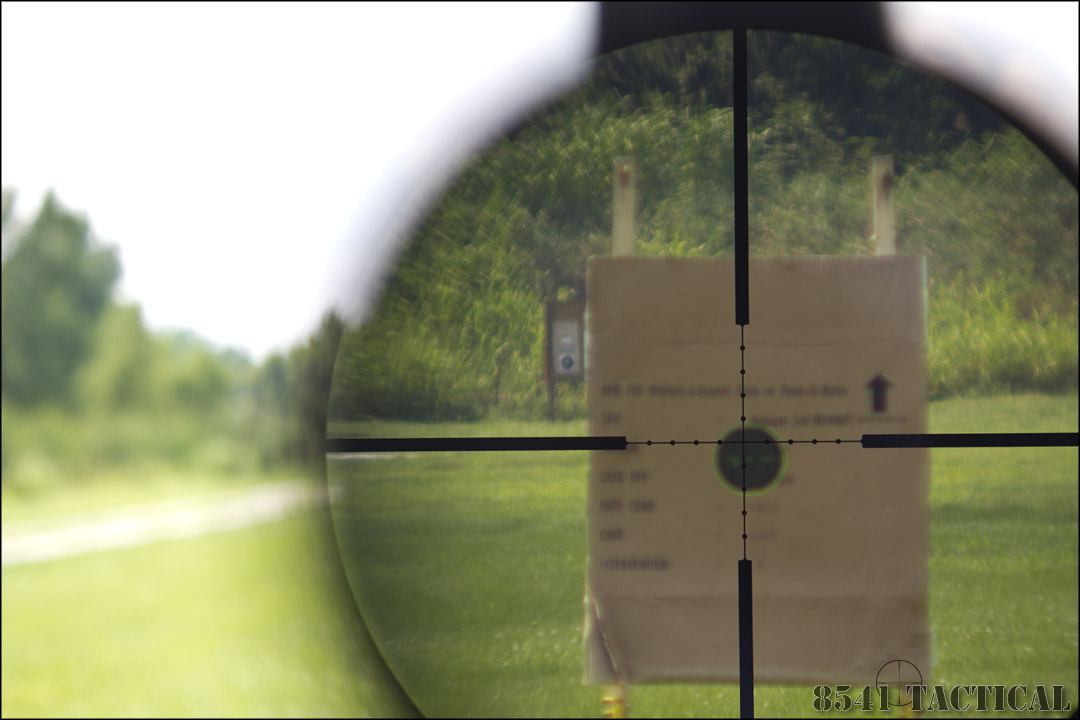
To begin our zero process we will set a large target backer at 50 yards. Place your target in the center. I prefer to use a large circular target such as a Birchwood Casey "Shoot-n-C". Set your rifle in a solid position using either a shooting rest or a bipod and rear bag. The key is you want to brace it so that it does not move as you adjust the turrets on the scope.
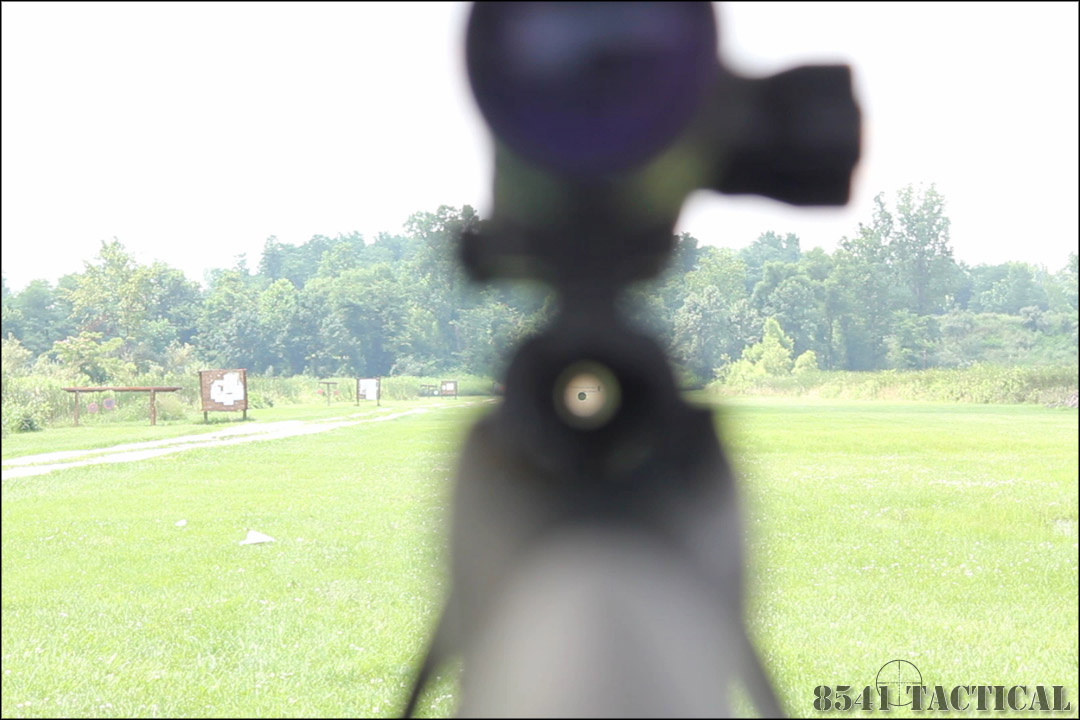
Remove your bolt. Adjust the position of the rifle until you center your target up through the barrel of the rifle (bore). Now without touching the rifle, look through the riflescope. More than likely your reticle will be pretty far from the center of the target. |
| Now this is where it gets confusing. For this set AND THIS STEP ONLY the directions on your turrets are reversed. If the center of the reticle is higher than the center of your target, then you will need to turn the elevation turret in the UP direction until the correct elevation is achieved. Next, if the center of the reticle is to the right of your target, you will need to adjust the turret RIGHT until it is centered on the target.
This is counter intuitive, but it is because the rifle scope is marked so that you are normally adjusting the impact of the round to the center of the reticle. In this case you are doing the opposite. You are adjusting the center of the reticle to where the impact of the round would be. Thus, all directions are reversed.
Once you have adjusted the reticle to the center of the target, sight through the barrel again to ensure you have not disturbed the rifle. If you have, repeat the process. When the reticle is aligned with the target as seen through the bore, the rifle is considered "boresighted" for the distance you have the target at. |
When you are sure that your rifle is accurately boresighted, load and fire one cartridge at the center of the target. This shot needs to be executed perfectly, since we are going to correct based on it. Breathe, take your time and squeeze the trigger. If you feel like you are going to toss the shot, then stop. Relax and start the process over. It doesn't matter if it takes ten minutes to take this shot. It needs to be perfect. Just hitting the circle isn't acceptable.
If you used a large Shoot-n-c as your target you should have a nice, clear shot hole somewhere near the center of the circle. Now we have several options on how to correct your rifle scope settings. If you are using a mil based reticle and you have mil based turrets, you can simply measure the deviation of the shot hole from the center and dial that correction in with the turrets. |
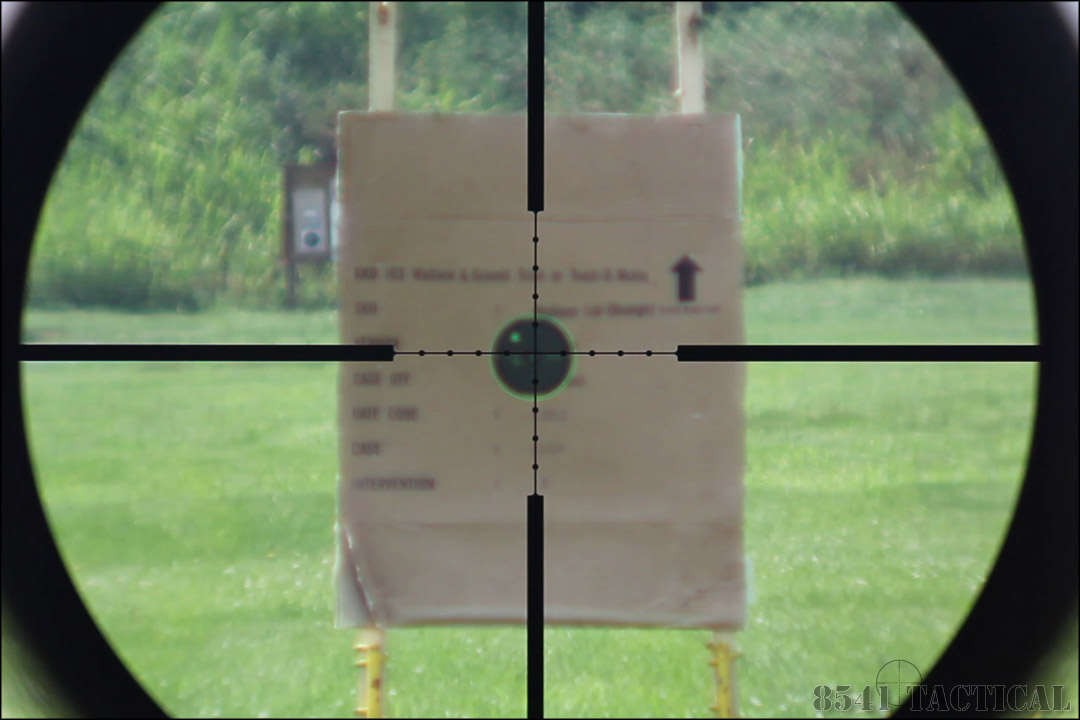 |
In the image above and right you will see our shot hole is at 10 o'clock relative to the center of the target. Measuring the offset with the reticle we see that the shot is 0.7 mRad left and 0.5 mRad high. Now we are adjusting the impact of a bullet so we do heed the direction markings on the turrets. If we dial seven tenths of a mil right and five tenths of a mil down our next shot should be dead center.
If you do not have a matching reticle and turrets we have to take a different approach. If your optic has a mil reticle and MOA turrets you can still dial a correction. One Mil (mRad) is 3.4 MOA. Take the deviation you measured and multiply it by 3.4. That will give you the correction in MOA. The catch is this only works if your scope turrets are accurate.
If you do not trust the accuracy of your turrets then you have another option. You can brace the rifle as you did during boresighting with the reticle on the center of the target. Then in the same manner as boresighting move the reticle from the center of the target to the center of the shot hole.
Once you have this first correction you can either fire a confirmation shot or move to the next step. If you don't have 100% confidence in your first shot, then I suggest a confirmation shot.
 |
When you have finished at the 50 yard line, move your target back to the 100 yard line. The process is exactly the same. If you have an accurate rifle and execute the fundamentals of marksmanship perfectly, you can have your rifle zeroed with two shots.
If you are less-experienced or you are shooting a rifle with questionable accuracy, then it may be wise to fire two or three shot groups before making corrections. When you do correct, use the center of the group.
Once you are done at 100 yards, remove the turrets from their splines and replace them with the zero indexed to the center marks on the turret housing. If there is any question on how to do this, consult your owners manual.
You should now have a rifle that is zeroed for 100 yards. If for some reason you have an extremely windy day. Then when you are done shooting, simply dial off the wind correction you made and then zero out the turrets. You will need to confirm your zero on a calm day but even a gusty day will allow you to get a rough zero. |
Things to think about:
Beware of "chasing your zero". I have seen gentleman at the range go through boxes of cartridges attempting to zero their rifles. They are looking for that last perfect shot. They dial a correction left, the shot hits right. They correct right, the shot goes left. This goes on and on, left, right, up and down until they have exhausted all the ammo they came with or they give up in frustration. Don't be "that guy".
If you are coming to the range and zeroing is your first task, warm up with some dry firing. Make sure that when you fire each shot in the process, that it is the best shot of your life. Don't be in a hurry. If you toss one then STOP, stand up and relax. Come back to it fresh. Once you are hitting the target within the accuracy potential of your rifle, you are done. This means if you are shooting a rifle that is only capable of 3/4 MOA don't mess with 1/4 MOA fine tuning. It just wastes ammo. Later when you are running a drill and notice that all of your shots are trending to one side, then it's fine to make a correction. If you have a rifle that is capable of stacking one shot on top of another AND you are capable of driving it to that level of precision, then it is fine to dial a zero in to the last quarter MOA or tenth of a mil. If not you are just wasting ammo.
It's not the wind! So many times I see a shooter toss a shot and then blame the wind. I have news for you. If you throw a shot 2" off the target at 100 yards, it's probably not the wind. Now if you are having problems with small cars blowing over at the time, then disregard my previous comment. In fact you can stop reading now because you are way more dedicated than I am if you are shooting in a hurricane.
Call your shots. When you walk down to the target is not the time to decide that your last shot was a "flyer". When you fire the rifle and the recoil hits your brain should take a "snapshot" of where the reticle was on the target. If you have dialed on the correct sight settings, then that location is where your bullet will impact. If you don't see this "snapshot" then you more than likely flinched and closed your eyes prior to recoil.
A helpful visual I have used it pretend you are Superman and try to burn the center of the reticle out with laser beam eyes. When the trigger breaks you should have no question where the reticle was centered. If you don't know where the reticle was, then mark that one down as a flinch and do twenty dry-fires as penance. Every time you flinch, stop and dry fire.
If the shot breaks and you saw the reticle at 9 o'clock, mark it down. When you check your shot if it comes out at 9 o'clock congratulate yourself on properly calling your shot. LEARN from your misses. Otherwise they are money wasted.
Flyers. A flyer is a shot that was executed perfectly and inexplicably leaves the cone of accuracy that the rifle is capable of. A flyer is NOT a shot you goofed. If you blow a shot, man up and own it. It will make you a better shooter when you can admit you screwed up and it wasn't the rifle or the bullet's fault. With the level of rifle systems and quality of ammo we deal with today, flyers are very infrequent. Lately they seem to be a great way for someone to turn a mediocre rifle into a match grade sniper rig. You see targets posted all over with three shots you can cover with a dime and one that is an inch out. It usually has a big red circle that is labeled "flyer".
If when you pulled the trigger you knew it was a bad shot, it wasn't a flyer. If when you pulled the trigger, you have no idea where the shot went, it wasn't a flyer. If you have been hammering 1/4" dots all day long, broke that last shot PERFECTLY and saw the reticle perfectly quartering that dot when the trigger broke......then a minor miss may have been a flyer. We are still working with either mass-produced ammunition or hand loads made by humans. An error is possible, but not anywhere near as likely as some would like to believe.
It's not a flyer if you shank it.....It's just a MISS. |
As always, this is not "THE" way, it's just "A" way. If your buddies' cousin's uncle's sister's pappy has been doing it a different way since the Revolutionary War, then feel free to give their way a try. It won't hurt my feelings. However the method outlined above may just save you a lot of ammo and a lot of time.
|